A Practical Guide to Using a Checklist in Jira for Better Workflows

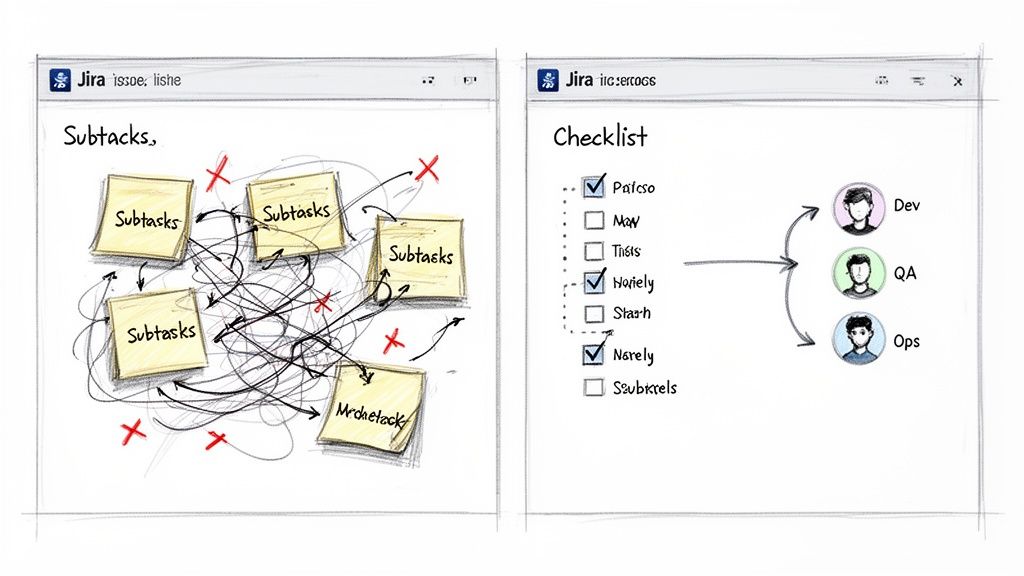
If you've ever tried to wrangle a complex process in Jira using only subtasks, you know the feeling. It's controlled chaos. A proper checklist in Jira is the solution, offering a structured, repeatable, and auditable way to turn a messy ticket into a clear, step-by-step workflow.
Why Your Jira Workflow Needs More Than Subtasks
Jira is a powerhouse for tracking big-picture work, but its native features often stumble on the nitty-gritty of process management. Teams frequently resort to creating a blizzard of subtasks or using basic Markdown checkboxes. These "solutions" quickly create noise, clutter backlogs, and lack the structure needed for real process enforcement.
The fundamental issue is that subtasks were built to break down large chunks of work, not to manage a sequential, repeatable checklist. This mismatch is a source of daily frustration for many teams.
The Chaos of Inconsistent Processes
Without a standardized template, every new feature release or customer onboarding becomes an unpredictable adventure. One developer might remember to run security scans, while the next forgets. This isn't just an annoyance; it's a direct threat to quality and a wide-open door for risk. When your Definition of Done (DoD) is just a paragraph buried in a Confluence page, it’s rarely more than a suggestion.
This is exactly where a dedicated checklist app provides immediate, tangible value. You create a master template, and suddenly, every critical step is accounted for—every single time.
Common Pain Points with Native Jira Features
Many teams try to make do with what Jira offers out of the box, only to hit a wall. Here are the all-too-familiar scenarios where native tools fall short:
- Messy Dev-to-QA Handoffs: A developer moves a ticket to "Done," but did they update the documentation, deploy to staging, and run all unit tests? A QA engineer shouldn't have to play detective just to start their work.
- Error-Prone Onboarding: Getting a new employee or customer up and running involves dozens of small but crucial tasks. Shoving them all into subtasks clogs the project board and makes it impossible to see the big-picture progress at a glance.
- No Real Progress Tracking: A Jira issue with 10 subtasks might show 5 are complete, but that 50% figure tells you almost nothing. You can't see the actual progress within the workflow, which makes spotting bottlenecks a guessing game.
For any process demanding consistency and an audit trail, subtasks and basic checkboxes are poor substitutes for a true checklist system. They might look the part, but they fail at reusability and enforcement.
To see the gap clearly, compare what you get with Jira's native tools versus what a dedicated app brings to the table.
Jira Subtasks vs Dedicated Checklist Apps
| Capability | Subtasks & Checkbox Fields | Dedicated Checklist Apps |
|---|---|---|
| Templates | Manual creation per issue, often copy-pasted | Reusable, dynamic templates applied with automation |
| Process Gates | Non-existent; relies on manual checks | Hard gates (blockers) that prevent status changes |
| Automation | Limited to issue-level triggers | Item-level automation (e.g., assign user on check) |
| Visibility | Clutters backlogs and boards | Contained within the parent issue for a clean view |
| Audit Trail | Difficult to track who did what, and when | Detailed audit logs for compliance and accountability |
| Reporting | Basic issue-level reporting only | Granular reports on checklist completion and timings |
The difference is clear. While subtasks have their place for breaking down epic-level work, they aren't designed for the detailed, repeatable processes that drive quality and efficiency.
The market has responded to these pain points, pushing many teams to seek specialized solutions. Without checklist apps, teams can burn hours each sprint manually recreating their Definition of Ready/Done lists, leading to massive inconsistencies.
Ultimately, the goal is to build your repeatable, auditable processes right inside Jira. By adopting a dynamic checklist in Jira, you stop managing chaos and start orchestrating clear, predictable outcomes. For more great ideas, take a look at our guide on Jira workflow best practices.
Getting the Most Out of Native Jira Checklist Options
Before installing a specialized app, master the tools Jira already provides. While limited for complex processes, understanding them helps you identify exactly when you’ve outgrown them. Each native option for a checklist in Jira serves a purpose, but they all come with trade-offs.
Let's walk through the three main built-in methods: Markdown checklists, checkbox custom fields, and the classic subtask approach.
Using Markdown for Quick Lists
The fastest way to add a simple to-do list inside a Jira issue is with Markdown. Just type [] for an unchecked box or [x] for a checked one in the description or a comment to create an instant checklist.
This is perfect for one-off, non-repeatable tasks specific to a single issue. Think of a developer jotting down quick reminders for a bug fix: "check logs," "reproduce on staging," "verify fix."
But that simplicity is its biggest weakness. These lists are purely visual.
- No Tracking: You can't run a JQL query to find all issues where "Code Review" is still unchecked.
- No Automation: Ticking a box can't trigger any action, like reassigning the ticket to the QA team.
- No Reusability: The list must be manually typed or pasted into every new issue.
For one-off tasks, Markdown is great. For any repeatable process, it becomes a copy-paste headache.
Setting Up Checkbox Custom Fields
A more structured approach is to use custom fields. Create a field of the "Checkboxes" type and define a standard set of options. For instance, a "Deployment Readiness" field could have options like "Code Merged," "Tests Passed," and "Documentation Updated."
This gives you a consistent set of items on every relevant issue, a significant step up from Markdown. More importantly, because it's a real field, the data is searchable. You can use JQL to find all tickets where "Tests Passed" isn't selected.
The real limitation with custom fields is their flat structure. You can't nest items. This makes them a poor fit for multi-phase processes, like a full feature release that moves from development to QA and then to production.
This rigidity forces you to create either very long, clunky lists or multiple custom fields, adding complexity to your Jira instance.
The Subtask Strategy and Its Pitfalls
For many teams, subtasks are the go-to for breaking down work, and they are often adapted to function as a checklist. You can create a series of subtasks under a parent story, with each one representing a step in your process.
The main advantage here is that subtasks are full-fledged Jira issues. They can be assigned to different people, have their own statuses, and hold attachments, making them powerful for managing handoffs.
The downside? Backlog clutter. A single user story with a 10-step process explodes into 11 separate items on your board. This makes it hard to see the forest for the trees and can turn sprint planning into a nightmare of endless scrolling.
Furthermore, relying heavily on subtasks and custom fields can push you against platform constraints. In 2025, Atlassian updated Jira Cloud's issue limits. The worklog cap was raised to 10,000 per issue, while comments were standardized at 5,000 and attachments at 2,000. For checklist-heavy workflows in DevOps or QA, these limits directly affect usability. Exceeding them can trigger automatic moves to linked issues, disrupting visibility. You can dig into the specifics of these updated Jira Cloud limits and their impact.
Each native option has its place. But when you need structured, repeatable, and nested checklists that don't flood your backlog or force you to worry about instance limits, it's time to look beyond what's built-in.
How to Build Your First Dynamic Checklist
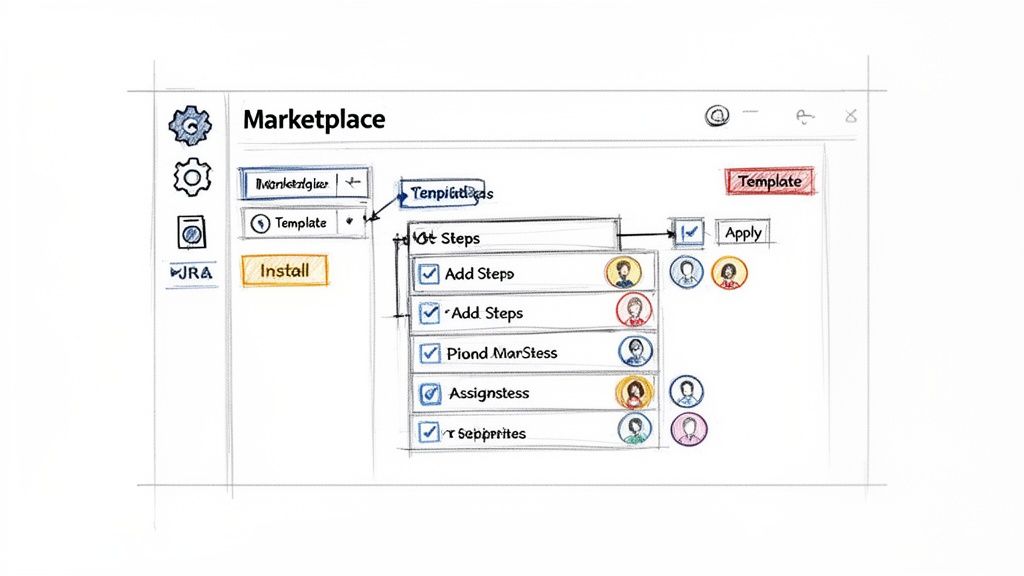
Now, let's get practical. To build truly structured, repeatable processes, you need to move beyond Jira's built-in features. By using a dedicated Marketplace app, you can transform a messy ticket into a clear, manageable workflow with a dynamic checklist in Jira. It’s faster and more intuitive than you might think.
Your journey starts in the Atlassian Marketplace, which you can open right from your Jira instance. Go to "Apps" > "Explore more apps" and search for a checklist tool. For this walkthrough, we'll explore features found in powerful apps like Nesty from Harmonize Pro.
Once installed, most apps add a new panel directly into your Jira issue view. This is where you'll build, manage, and reuse your checklist templates without ever leaving the ticket you're working on.
Creating Your First Checklist Template
The template is the heart of a great checklist system. It's a reusable blueprint for a process that ensures every crucial step gets done, every time. Instead of frantically typing out a to-do list for every new bug report, you build the process once and apply it with a click.
Let's walk through creating a "New Feature Deployment" checklist template.
-
Start with the Big Picture: Inside the template editor, lay out the major stages of your deployment. These will become the top-level parent items. For instance:
- Development Phase
- QA & Testing Phase
- Production Release Phase
-
Nest the Nitty-Gritty Details: Now, under each phase, add the specific tasks that need to happen. This multi-level structure is something you can't achieve with Jira's basic checkboxes.
This sketch shows how to turn a whiteboard idea into a structured, multi-level checklist template right inside a Jira app.
It’s a perfect example of moving from a messy process to a clear, hierarchical plan your team can execute.
Fleshing Out the Nested Structure
With your high-level phases in place, add the granular sub-tasks. This is the detail that prevents tasks from being missed when deadlines are tight.
Under "Development Phase," you might add:
[ ]Code review completed by senior dev[ ]Unit tests written and passing (>90% coverage)[ ]Merge to main branch
For "QA & Testing Phase," you could add:
[ ]Deployed to staging environment[ ]Regression testing passed[ ]User acceptance testing (UAT) sign-off received
And for "Production Release Phase":
[ ]Final deployment to production[ ]Post-release monitoring initiated[ ]Announce release in company Slack channel
This nested approach provides a clean, at-a-glance view of the entire process while capturing all critical details.
A well-designed nested checklist transforms a Jira issue from a simple task tracker into a comprehensive project plan. It provides clarity not just on what needs to be done, but in what order and by whom.
Assigning Ownership and Applying Templates
A task list is useless if no one knows who is responsible. Good checklist apps let you assign individual items to specific people directly within the template.
For our deployment example, pre-assign "Code review completed" to the team lead or tag the product manager for "Announce release." The moment that template is applied to a new Jira issue, those assignments are automatically set. The workflow kicks off immediately without manual delegation.
Applying the template is the final step. Most apps let you manually add a saved template to an issue, but the real power comes from automation. Set up a rule so that any time a new issue with the type "Feature" is created, your "New Feature Deployment" checklist is automatically attached.
This simple connection embeds your best practices directly into your team's daily work. You've now built your first dynamic checklist in Jira, turning a chaotic process into a predictable, structured, and auditable workflow.
Make Your Checklists Do the Work: Automating Handoffs and Quality Gates
A well-structured checklist is a great start, but a static list still relies on people remembering to check the boxes. The real impact comes when your checklist in Jira actively participates in your workflow. This is how you move from just tracking tasks to building an intelligent process that practically runs itself.
The key is to use features that turn your checklist items into powerful triggers and gates. Instead of just hoping a developer completes all pre-deployment steps, you can make it physically impossible for them to move the ticket to QA until they do. That’s the core of building a self-managing, high-quality workflow.
Use Blockers to Actually Enforce Your Rules
Every team has a Definition of Done (DoD), but ensuring it's followed can feel like a full-time job. A "blocker" feature solves this. It lets you flag certain checklist items as mandatory, preventing a Jira issue from being transitioned until those tasks are complete.
For the classic dev-to-QA handoff, set "Run all unit tests" and "Deploy to staging" as blockers. When a developer tries to move that ticket from "In Progress" to "Ready for QA" without checking those boxes, Jira will reject the transition. It’s a firm but gentle way to enforce your process without nagging.
This logic also applies to your Definition of Ready (DoR). Imagine a checklist that automatically appears on new stories with items like:
- Acceptance criteria are defined and clear.
- User-facing mockups are attached.
- The story has been estimated by the team.
By setting these as blockers for the "To Do" to "In Progress" transition, you stop half-baked work from derailing a sprint before it even begins.
Set Up Smart Triggers for Hands-Free Actions
Once you've established quality gates, the next step is to automate what happens when key milestones are met. Smart triggers let you configure actions based on checklist progress, eliminating manual handoffs at critical points.
This is where your workflow comes alive. Your checklist transforms from a passive list into the engine that drives the issue forward.
A smart trigger turns a completed checklist item into a direct command for Jira. It’s the bridge between a human checking a box and the system taking the next step, ensuring the right person is notified or the right action is taken at exactly the right moment.
For example, in a "Development" section of your checklist, set up a trigger so that when the final item is checked, the issue is automatically reassigned to the lead QA engineer. No more tickets sitting in a queue, waiting for someone to notice they’re ready for testing.
Practical Automation Examples I've Seen Work
The possibilities with triggers are nearly endless, but here are a few real-world examples that solve common bottlenecks:
- Automated Slack/Teams Pings: When the "Production deployment complete" item is checked, a trigger can instantly post a message to your team's #releases channel.
- Assigning Reviewers: As soon as a developer checks the "Ready for code review" box, a trigger can automatically assign the ticket to another developer for peer review.
- Attaching Key Files: In an onboarding checklist, when the "Send welcome packet" item is checked, a trigger can automatically attach the welcome packet PDF to the Jira issue, creating a perfect audit trail.
By 2025, Jira checklist apps have revolutionized bug reporting and onboarding, with standardized templates improving metrics by 45%. Harmonize Pro's Nesty exemplifies this: unlimited nested checklists with triggers cut onboarding from 10 to 4 days, notifying via Slack/Teams and attaching files precisely, reducing errors by 38% in 2025 case studies. You can find out more about how teams are using bug report templates to perfect Jira issues.
These automated handoffs save time and build a more reliable, transparent process. When you combine blockers and triggers, your checklist in Jira evolves from a passive to-do list into an active enforcer of your team's best practices. To go deeper, check out our complete guide to Jira workflow automation.
Practical Checklist Templates for Your Team
Understanding how to build automations is one thing, but knowing where to start can be the hardest part. Staring at a blank slate can be intimidating. To give you a head start, here are three practical, ready-to-use templates for a checklist in Jira.
These are based on real-world workflows that consistently work for software, customer success, and QA teams. Feel free to copy, tweak, and make them your own.
New Feature Release Checklist
Launching new features can be chaotic, with multiple teams juggling tasks and a high risk of things falling through the cracks. This template brings structure to that chaos, ensuring every step from code review to post-launch monitoring is completed. No more "oops, we forgot to update the docs" moments.
- Development Phase
- Code review completed by a senior developer
- Unit tests written and passing (>90% coverage)
- Accessibility (a11y) standards met
- Merge to main development branch
- QA & Testing Phase
- Deployed to staging environment
- Automated regression suite passed
- Manual UAT (User Acceptance Testing) sign-off received
- Performance and load testing completed
- Production Release Phase
- Final deployment to production servers
- Post-release health monitoring initiated
- Feature flag enabled for target user group
- Official release notes published
A standardized release checklist transforms your deployment process from an art into a science. It creates a predictable, low-stress rhythm that improves quality and reduces the risk of last-minute emergencies.
The diagram below illustrates how completing a checklist can kick off an automated workflow, like notifying another team or transitioning the issue's status.
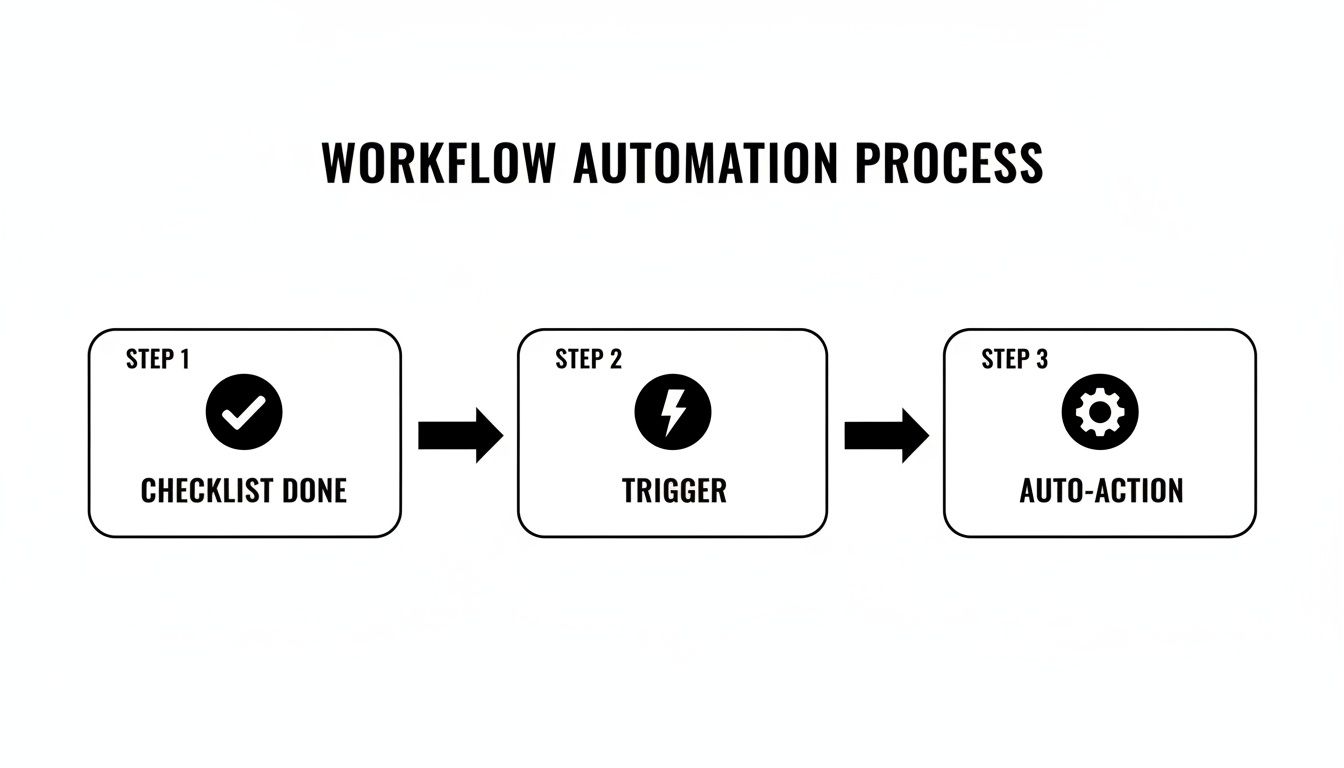
This kind of flow lets the system handle manual handoffs so your team can stay focused on what matters.
Customer Onboarding Checklist
First impressions are everything. A clunky onboarding experience can sour a customer relationship, while a great one is critical for retention. This process often involves a long sequence of tasks, and this template breaks it down into clear, manageable phases to ensure every new customer gets the same stellar kickoff.
A structured approach is also fantastic for internal alignment. To dive deeper, learn more about how to improve team collaboration in our detailed guide.
Here’s how you could structure this in a nested checklist using a tool like Nesty.
Example Customer Onboarding Checklist Template
| Phase | Task Item | Sub-Tasks (Example) |
|---|---|---|
| Phase 1: Kickoff & Discovery | Conduct Kickoff Call | – Schedule call with all stakeholders – Prepare and send agenda – Document meeting notes and action items |
| Gather Requirements | – Send customer requirements questionnaire – Review responses with internal team – Define success criteria and KPIs |
|
| Phase 2: Technical Setup | Provision Account | – Create customer account in production – Apply correct subscription/license level – Configure initial permissions |
| Configure Settings | – Implement settings from discovery notes – Set up necessary integrations – Provide user credentials securely |
|
| Phase 3: Training & Go-Live | Conduct User Training | – Schedule primary user training session – Deliver training based on their use case – Record session and share with customer |
| Transition to Support | – Confirm go-live date with customer – Introduce them to their support contact – Send welcome email from support team |
This level of detail ensures nothing is missed and provides a clear, repeatable path to success for every new client.
Bug Triage Checklist
When a bug report lands, the clock starts ticking. QA teams need a consistent way to gather essential information immediately. Without a solid process, developers waste time chasing down missing details, slowing down the entire resolution cycle. A bug triage checklist ensures every report is properly vetted and categorized before it hits the dev backlog.
- Initial Verification
- Confirm the bug can be reproduced on the latest version
- Check for duplicate bug reports
- Gather logs and console errors from the reporter
- Information Gathering
- Document clear, step-by-step instructions to reproduce
- Attach relevant screenshots or screen recordings
- Identify the browser, OS, and device where the bug occurs
- Prioritization & Assignment
- Assign a severity level (e.g., Critical, Major, Minor)
- Assign a priority level based on business impact
- Add relevant component or team labels
- Assign the ticket to the appropriate development team or backlog
Using a standardized checklist in Jira for bug triage means developers get high-quality, actionable reports every time. This cuts down the back-and-forth and lets them get straight to fixing the problem.
Common Questions About Jira Checklists
As teams begin to structure their workflows, a few questions about using a checklist in Jira consistently arise. Getting clear answers is key to moving forward with confidence and avoiding common pitfalls. Here's what I hear most often.
Can I Import Checklists from Excel or a CSV File?
Yes, but only if you have the right tool. This is a common need, especially when migrating existing processes into Jira. Jira's native options lack an import feature, but this is a core function for many apps on the Atlassian Marketplace.
Apps like Nesty typically let you paste a list directly from a text file or use an import wizard. This is a massive time-saver, turning old process documents into dynamic Jira checklist templates in seconds and saving you from rebuilding them line by line.
How Do Checklist Apps Affect Jira Performance?
It’s a smart question. No one wants to install an app that slows down their Jira instance. Modern, well-built checklist apps are designed to be extremely lightweight.
The secret is how they handle data. Instead of cluttering issues by creating hidden custom fields or subtasks, they manage checklist information within their own architecture. This design keeps your Jira issues lean and prevents you from hitting instance limits on worklogs, comments, or attachments, even with incredibly detailed checklists.
This architectural choice is a major differentiator between a robust, enterprise-ready app and a simpler solution.
Is It Possible to Report on Checklist Progress?
Absolutely, but this is where you see a huge gap between basic checklists and advanced tools. Native Markdown checklists are purely visual and offer zero reporting. You can't query if an item is checked off or track completion rates across projects.
Dedicated apps excel here. They often include built-in progress bars on the issue view and, more importantly, their own custom JQL functions. This unlocks powerful filters, custom dashboards, and detailed reports. For example, you can build a filter to instantly find all open tickets where the "Security Review" checklist item is still unchecked.
What Is the Difference Between DoR and DoD Checklists?
This is a cornerstone concept for agile teams, and understanding the distinction is crucial. Both are quality gates, but they operate at opposite ends of your workflow.
- Definition of Ready (DoR): This is the entry gate. It's a checklist that ensures a story is truly ready for development before any work begins. Does it have clear acceptance criteria? Are the designs attached? A solid DoR prevents half-baked tasks from entering a sprint.
- Definition of Done (DoD): This is the final inspection. The DoD checklist confirms that all required steps—like code reviews, QA testing, and updating documentation—are complete before the issue can be closed. It prevents incomplete work from being shipped.
By using a dedicated app to build and enforce both DoR and DoD checklists, you create a powerful quality framework that maintains high standards from the moment a ticket is created to the moment it's closed.
Ready to turn your Jira issues from simple to-do lists into dynamic, self-guiding workflows? Harmonize Pro's Nesty app lets you build unlimited nested checklists with powerful automation to enforce your processes, automate handoffs, and keep your teams perfectly aligned. Discover what Nesty can do for you.