A Practical Guide to Jira Workflow Automation

Jira workflow automation is a method for building simple, rule-based logic into your projects to handle repetitive tasks. Use it to create a series of if-this-then-that instructions that automatically transition tickets, notify the right people, and update fields without manual intervention. This guide will show you how to apply this strategy to make your operations run smoothly as you scale.
Why Jira Workflow Automation Is a Game Changer
Manual Jira updates are a significant time sink. Projects often get bogged down by tedious updates, slow handoffs between teams, and simple human error. For example, a developer might push their code but forget to move the ticket into the "Ready for QA" column. As a result, the testing team remains unaware that a task is waiting, bringing the entire process to a halt.
This is the exact problem Jira workflow automation solves. It transforms your static Jira board into a dynamic, self-managing system. Instead of relying on individuals to remember every step in a complex process, you build rules that execute these tasks automatically.
Moving Beyond Manual Drudgery
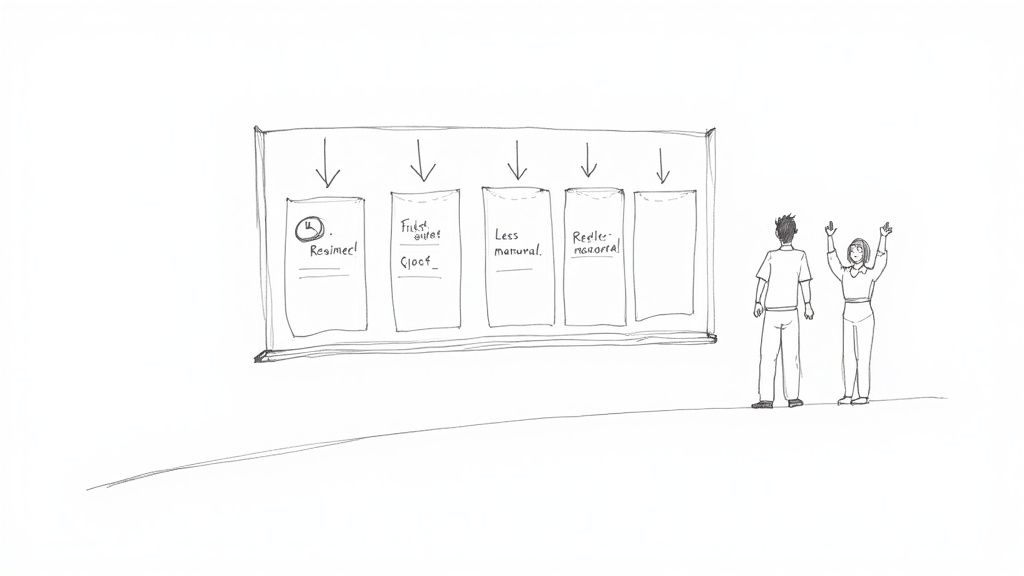
The primary value of automation is reclaiming your team's most valuable resource: time. By automating routine administrative tasks, you enable your engineers, QA analysts, and project managers to concentrate on high-impact work.
Here are common problems that you can eliminate with automation:
- Slow Handoffs: Tickets no longer sit idle waiting for a manual status or assignee change. Automate these transitions to ensure work flows continuously.
- Inconsistent Data: Enforce required fields upon ticket creation or transition. This eliminates the need to chase down information and ensures your reports are built from complete data.
- Constant Context Switching: Allow developers to stay focused on coding instead of frequently switching to Jira for ticket updates. Integrate your Git repository to update tickets automatically based on developer actions.
- Missed Notifications: Set up rules to automatically notify key stakeholders at critical workflow stages, ensuring everyone stays informed.
The goal is not just to accelerate tasks, but to build a reliable and predictable system that reduces the mental load on your team. When the process works seamlessly, your team can focus on solving problems and innovating.
The Tangible Impact on Your Team
Implementing Jira workflow automation provides immediate, measurable benefits. It is a core reason why Jira is a market leader, controlling over 42% of the project-tracking market. Its automation engine is the foundation for workflows used by millions daily, demonstrating its value as an essential feature.
The results are clear: tickets are resolved faster, and project data becomes more accurate and reliable. For teams looking to implement more structured processes, our guide on getting started with Nesty provides actionable steps for creating nested checklists and advanced triggers.
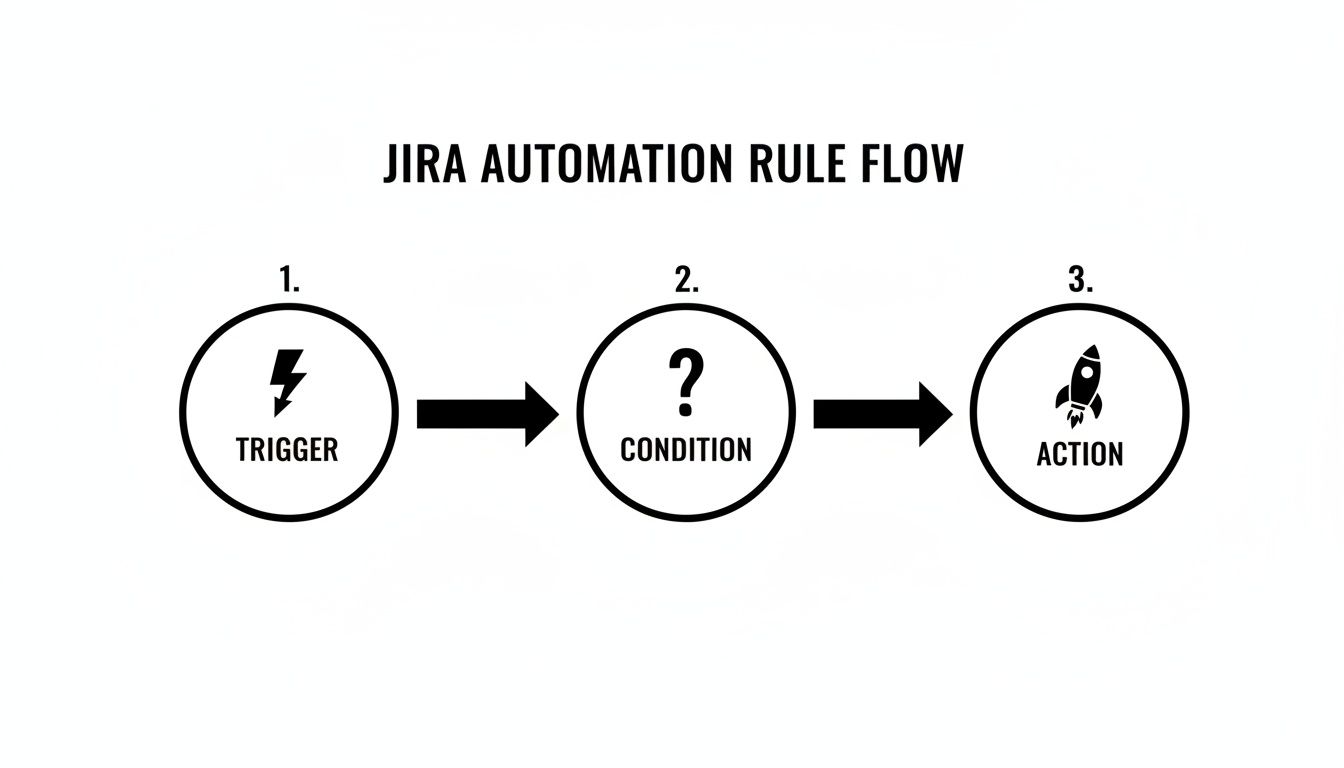
Understanding The Building Blocks Of An Automation Rule
To effectively use Jira workflow automation, you need to understand its fundamental logic. Every automation, regardless of its complexity, is composed of three core components: Triggers, Conditions, and Actions.
This structure operates like a simple command: a catalyst (Trigger) initiates the process, a set of qualifiers (Conditions) confirms it should proceed, and a task (Action) is executed. Mastering this sequence is key to building automations that genuinely assist your team.
Here is a breakdown of these components:
| Component | Purpose | Actionable Examples |
|---|---|---|
| Trigger | The "If this happens…" event that starts the rule. | Issue Created, Field Value Changed (e.g., Priority is updated), Issue Transitioned (e.g., moves from "To Do" to "In Progress"), Comment Added. |
| Condition | The "…only if this is true…" checkpoint. The rule stops if conditions are not met. | Issue Type = Bug, Status = In Review, Assignee is empty, or a JQL query like priority = Highest AND "Story Points" > 8. |
| Action | The "…then do that" task performed by the rule. | Transition Issue, Edit Issue (e.g., add a label), Send Slack/Teams notification, Create sub-tasks, Add a Nesty checklist. |
This Trigger → Condition → Action framework is the foundation for everything from sending a simple notification to orchestrating a complex, multi-step deployment process.
Triggers: The Starting Gun
A Trigger is the event that initiates an automation rule. Your rule remains dormant until its specified trigger event occurs.
These events can range from a specific user action to a scheduled time, giving you precise control over when your automations execute.
Here are common triggers to implement:
- Issue Created: Use this for setup tasks. When a new issue is logged, automatically assign a default component or add a standard "Definition of Done" checklist.
- Field Value Changed: This is highly practical. For instance, trigger a rule the moment the Priority field is changed to Highest to escalate visibility.
- Issue Transitioned: Fire the rule when an issue moves between statuses, such as from ‘In Progress’ to ‘In Review’, to notify the next person in the chain.
- Version Released: Use this trigger for cleanup. Build a rule to automatically find and close all tickets associated with a version upon its release.
Selecting the correct trigger is the critical first step. An incorrect choice can cause your rule to execute too frequently, not at all, or at inconvenient times.
Conditions: The Brains Of The Operation
If the trigger starts the process, the Condition decides whether it should continue. It acts as an "…only if this is true" checkpoint. After a trigger fires, Jira evaluates the conditions you've set. The rule proceeds to the action only if all conditions pass. If any condition fails, the rule halts.
This is how you add precision to your Jira workflow automation. Conditions prevent your rules from running on every issue, allowing you to target very specific scenarios.
A common mistake is building rules with only a trigger and an action. Conditions provide the necessary control, preventing a rule designed for bug reports from incorrectly running on new feature stories.
Base your conditions on any data point within an issue. For example, use a JQL (Jira Query Language) condition to check if issueType = Bug AND priority = High. Alternatively, use a simpler field condition to check if the ‘Assignee’ field is empty. For advanced use cases, you can even check for a specific change in assignee to initiate a series of other checks.
Actions: The Workhorse
The final component is the Action—the "then do that" part of the rule. Once the trigger fires and all conditions are met, the action is the task the rule performs. This is the workhorse of your automation, executing repetitive tasks so your team doesn't have to.
The range of available actions is extensive, covering everything from modifying the issue itself to communicating with external tools.
Here are a few practical actions you can configure:
- Transition Issue: Automatically move an issue to the next status in your workflow.
- Edit Issue: Modify a field's value, such as setting a due date or adding a label.
- Send a Notification: Ping a user, group, or channel in Slack or Microsoft Teams.
- Create Sub-tasks: Instantly break down a larger story into predefined sub-tasks and assign them to the appropriate team members.
By combining Triggers, Conditions, and Actions, you can construct powerful automations tailored to your team's specific workflow.
Practical Automation Recipes You Can Use Today
Understanding the theory of Jira workflow automation is useful, but applying it delivers tangible results. This section provides battle-tested automation recipes you can implement immediately to eliminate common bottlenecks and manual work.
Every automation rule follows a Trigger → Condition → Action sequence. Once you internalize this logic, you can analyze any manual process and break it down into an automatable workflow.
Automatically Assign Bugs to the Right QA Lead
A common bottleneck is bug triage, where new bugs sit in the backlog awaiting assignment. This recipe routes new bugs directly to the appropriate QA lead, preventing delays.
Implement it with this configuration:
- Trigger:
Issue Created - Condition:
Issue Type = BugANDComponent is not empty - Action: Use an
If/else blockto route the issue based on its component.- If:
Component = "API"→ Action:Assign issue to Jane Doe - If:
Component = "UI/UX"→ Action:Assign issue to John Smith - If:
Component = "Database"→ Action:Assign issue to Emily Rogers
- If:
With this rule active, bugs are immediately assigned upon creation, eliminating manual handoffs and ensuring they enter the QA queue without delay.
Move a Task to “In Review” When a Pull Request is Opened
Developers often face context switching when they finish coding, open a pull request, and then must remember to update the corresponding Jira ticket. This automation eliminates that manual step, keeping Jira synchronized with your development work.
To set this up, ensure Jira is connected to your Git provider (e.g., GitHub or Bitbucket).
- Trigger:
Pull Request Created - Condition: (Optional but recommended)
Status = "In Progress". This prevents the rule from moving a ticket backward in the workflow. - Action:
Transition issue to "In Review"
This rule provides immediate visibility to the entire team. Product managers can see what is ready for review, and QA can prepare test cases without waiting for a developer's status update.
The key benefit is that Jira begins to reflect the actual state of work, rather than being an additional task for developers. The workflow follows the work, not the other way around.
Auto-Close Stale Tickets and Keep Your Backlog Clean
Backlogs often become cluttered with old, irrelevant tickets. This recipe functions as a digital janitor, automatically closing issues that have been inactive for an extended period.
- Trigger:
Scheduled(configure it to run daily or weekly). - Condition: Use a JQL query like
Status = "Awaiting Customer Feedback" AND Updated < -90dto target issues untouched for 90 days. - Action: First,
Add a commentsuch as, "Closing this due to inactivity. Please feel free to reopen it if the problem persists." Then,Transition issue to "Closed".
This practice keeps your team focused on active work and improves the accuracy of your reporting by removing obsolete items from the backlog. Automating such tasks is a key driver behind the global workflow automation market's projected growth to over $45 billion. Industry reports indicate that smart automation can cut triage time by 30-60%, freeing up significant team capacity.
Sync Parent Task Status with Its Sub-Tasks
A parent story should not remain "In Progress" when all its sub-tasks are complete. This automation ensures the parent issue's status accurately reflects the state of its underlying work.
- Trigger:
Issue Transitioned(fires when any sub-task changes status). - Condition: First, verify that the triggering issue is a sub-task.
- Action: Use the
Branch rule / related issuesoption.- Branch for:
Parent - Condition (on the parent): Add a condition to verify that all other sub-tasks of the parent are also in the "Done" status.
- Action (on the parent):
Transition issue to "Done"
- Branch for:
This creates a self-managing work hierarchy, which is particularly useful for complex features with numerous sub-tasks. For teams requiring even more structure, our pre-built Nesty templates offer advanced capabilities. Learn how to add nested checklists and quality gates to enforce your Definition of Done in our guide to Nesty developer workflows.
These recipes are a starting point. By creatively combining Triggers, Conditions, and Actions, you can configure Jira to match your team's real-world processes, saving time and building a more reliable system.
Advanced Techniques for Complex Workflows
Once you master the basics, you can begin automating more complex processes in Jira. Moving beyond simple trigger-action recipes allows you to tackle your team's most nuanced workflows. These advanced techniques transform your rules from simple helpers into the operational core of your project.
Use these methods to build automations that reflect your team's unique processes, making the system adapt to your workflow rather than forcing your workflow to fit the tool.
Handling Multiple Scenarios with Branching Logic
A standard automation rule follows a linear path. However, real-world workflows often have a single trigger that can lead to multiple outcomes. Use branch rules to manage these scenarios effectively.
Branching allows you to create multiple "if-this-then-that" paths within a single rule. Instead of building five separate automations for the same trigger, you can create one master rule that intelligently routes the work.
For example, when a developer merges a pull request, the next step can vary:
- A bug fix might need to go to "Ready for Regression Testing."
- A new feature should move to "Ready for UAT."
- A small tech debt story can go straight to "Done."
A branch rule handles this by using the Pull Request Merged trigger and then branching based on the issueType to transition the issue to the correct status. This approach keeps your automation logic clean, organized, and easier to manage than multiple overlapping rules.
The primary advantage of branching is consolidation. You create a single source of truth for a key workflow step, which simplifies debugging and future updates.
Making Your Automations Dynamic with Smart Values
Static actions have limitations; you cannot hard-code every possible assignee or comment for every scenario. Smart Values solve this by letting you pull dynamic information from your issues and inject it directly into your automation actions.
Smart Values are placeholders, like {{issue.summary}} or {{reporter.displayName}}, that Jira replaces with real-time data when the rule executes. They add context and personalization to your automations.
Here are ways to use them immediately:
- Personalized Notifications: Instead of a generic message, send a Slack notification like:
"Hey {{assignee.displayName}}, the priority on '{{issue.summary}}' was just raised to Highest by {{initiator.displayName}}." - Dynamic Comments: When escalating an issue, automatically add a comment that tags relevant stakeholders and provides context:
@"squad.lead", the due date for this issue was just changed to {{issue.duedate}}. Please review. - Copying Field Data: Sync information between related issues. When creating sub-tasks, use Smart Values to automatically copy the parent issue's
Fix VersionandComponentfields to the new sub-tasks.
Using Smart Values makes your automations more informative and feel less robotic, acting more like a helpful team member who provides the right information at the right time.
Running Automations on a Schedule
Not all automations should be triggered by a user action. Some of the most effective rules run in the background, maintaining project hygiene and data accuracy. For these time-based processes, use scheduled rules.
Set these rules to run at a specific interval—such as daily or weekly. The rule then executes a JQL query to find a batch of issues meeting your criteria and performs an action on them.
This is ideal for housekeeping tasks:
- Find Stale Issues: Create a daily rule to find all issues that have not been updated in 30 days and add a comment requesting a status update.
- Identify Blocked Work: Set up a rule to run each morning that identifies high-priority issues with the "Blocked" flag and sends a summary to a project manager's Slack channel.
- Enforce SLAs: For support teams, a scheduled rule can run hourly to find tickets approaching their SLA breach time and automatically escalate their priority.
Scheduled rules help you proactively manage your workflow instead of constantly reacting to problems after they have already caused delays.
Integrating with External Tools Using Webhooks
Your workflow often extends beyond Jira, connecting to code repositories, CI/CD pipelines, and communication platforms. Webhooks enable your Jira automation to interact with these external systems.
A webhook is an automated message sent from Jira to another application when a specific event occurs. Configure an action in your automation rule to "Send web request." When the rule runs, Jira sends an HTTP POST request with relevant issue data (in JSON format) to a URL you provide.
This enables deep, cross-tool integration. For instance, a development team can link Jira to their CI/CD pipeline:
- Trigger: An issue is transitioned to "Ready for Deployment."
- Action: A webhook is sent to a tool like Jenkins or GitHub Actions.
- Result: The external tool receives the webhook, reads the issue key from the JSON payload, and automatically initiates the correct deployment script.
This creates a seamless flow from development to production, orchestrated entirely by your Jira workflow. By combining these advanced techniques—branching, Smart Values, scheduled rules, and webhooks—you can build an intelligent system that automates even your most intricate processes.
How to Manage Automation Rules Without Creating Chaos
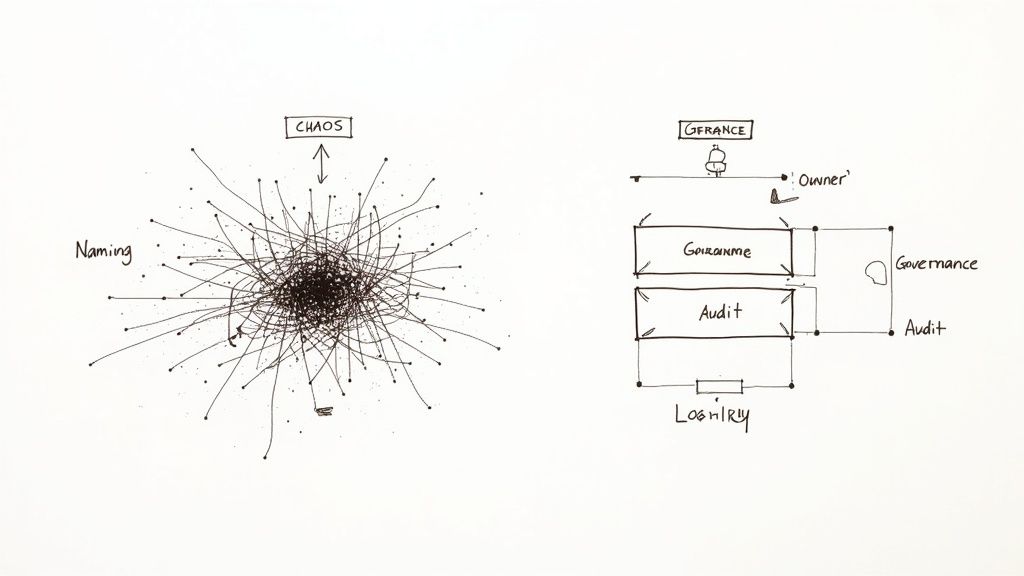
As your team adopts automation, it's easy for rules to become a tangled, undocumented mess, leading to conflicts, silent failures, and maintenance challenges. This "rule sprawl" is a common problem that arises without a clear governance plan.
To prevent this, establish a simple governance framework. These guidelines will help keep your Jira workflow automation scalable, transparent, and manageable as your team grows.
Establish Clear Naming Conventions
The first step is to enforce a consistent naming convention for every rule. A vague name like "Update Ticket" creates future confusion. In contrast, a name like [DEV] → [QA] | Transition to In Review on PR Creation clearly communicates the rule's purpose, scope, and trigger.
A robust naming structure should include:
- Scope or Team: Identify the relevant team, such as
[Marketing],[DevOps], or[Support]. - Trigger Event: Use clear terms like
On PR MergeorOn Bug Creation. - Primary Action: Describe the main task, such as
Assign to QA LeadorClose Stale Ticket.
This discipline makes your automation library easy to scan and is invaluable for debugging or locating a specific rule.
Use Labels to Organize and Filter Rules
Jira allows you to add labels to your automation rules. Use this feature to group related automations, effectively creating folders that let you filter your list and find what you need quickly.
Think of labels as an organizational toolkit. Create labels like
notifications,ci-cd,triage, orhousekeeping. This enables you to instantly view all rules related to a specific function, regardless of their project.
This is highly effective for auditing. If you suspect an issue with your notification system, filter by the notifications label to review all relevant rules at once, instead of searching through a long, unsorted list.
Define Ownership and Monitor Usage
Not all rules are equal. Enterprise governance often requires a tiered approach. Allow team leads to manage project-specific rules, but assign a designated owner or a small governance team to any global rules that affect multiple projects.
This is crucial because automation is a finite resource. Atlassian plans have execution limits, and exceeding them can throttle your instance or incur extra costs. Central ownership for global rules helps prevent redundant or inefficient automations from consuming your monthly quota. For further reading, there are excellent governance models for Jira on dev.to available.
Make it a practice to regularly review the audit log for failures and monitor your usage statistics. If a single rule is responsible for 40% of your monthly executions, investigate whether it can be optimized. Proactive monitoring ensures your system remains healthy and performant, supporting your organization's growth.
Frequently Asked Questions About Jira Automation
As you implement Jira workflow automation, you will likely encounter specific challenges. Here are answers to some of the most common questions from teams getting started.
Can Automation Rules Run in a Specific Order?
A frequent question is whether you can force an execution order when multiple rules share the same trigger.
The short answer is no. Jira processes rules triggered by the same event asynchronously, so you cannot guarantee their execution order.
The best practice is to consolidate the logic into a single, smarter rule. Instead of creating three separate rules, build one master rule that uses branching logic (e.g., if/else blocks) to handle the different conditions. This approach makes the execution path predictable and simplifies debugging.
How Do I Test an Automation Rule Without Affecting Live Data?
To avoid accidentally impacting your production project, test your automation rules in a safe environment.
The recommended method is to create a dedicated "sandbox" project. Clone your main project’s workflow and settings to create a safe space where you can build and refine rules using test issues.
Another practical tip is to add a temporary condition to your rule, such as creator = currentUser(). This ensures the rule will only run on issues you create. Once you have confirmed it works correctly, remove the condition to deploy it.
Pro-Tip: Use a "manual trigger" for testing. Configure the rule to fire only when you click a specific button on an issue. This gives you complete control over when and where the automation runs during the testing phase.
What’s the Difference Between Project and Global Rules?
Understanding this distinction is key to keeping your Jira instance organized.
-
Project Rules: These are created within a specific project and can only affect issues in that project. They are ideal for team-specific processes and can be managed by project administrators.
-
Global Rules: These are configured by a Jira administrator and can run across multiple projects or your entire Jira site. Use them to standardize processes everywhere, such as ensuring every "Bug" issue created in any project receives a specific label.
Knowing when to use each type helps prevent "rule sprawl" and keeps your automations manageable as your organization scales.
Ready to go beyond basic automation and build truly intelligent, structured workflows? Harmonize Pro's flagship app, Nesty, transforms your Jira issues with unlimited nested checklists, quality gates, and smart triggers to automate complex handoffs for Dev→QA, deployments, and onboarding.
Learn how Nesty can enforce your Definition of Done and finally put an end to all that manual busywork.
Article created using Outrank